When it comes to WordPress security, users usually fall into two camps: the ones who take security seriously and learn how to secure their site and those who believe or hope nothing will happen to them because they are not important enough.
Unfortunately, the second group is often wrong. Most security breaches aren’t personal but instead performed by faceless automatic scripts that don’t care about the relative importance of your site.
Consequently, WordPress security is a matter for everyone. To give your site the best chance of staying safe and sound, in the following, we will go over actionable tips on how to secure your WordPress site. Follow them to avoid having to deal with the aftermath of having your site defaced, hacked, or taken down.
Table of Contents
- Why Investing in WordPress Security Matters
- Follow Best Practices to Create Baseline Security
- Advanced Techniques to Secure WordPress
- Technical WordPress Security Measures
- WordPress Website Security: Last Words
Why Investing in WordPress Security Matters
WordPress is one of the most popular content management systems out there and with good reason. It’s simple to use, there are thousands of themes and plugins available for it, and you can create any type of website with it. It’s no wonder then that WordPress powers more than 40% of all websites on the Internet.
But, its popularity comes with a cost. WordPress is often the target of hackers. According to Sucuri, in 2019, 94% of all website cleanup requests come from owners of WordPress sites, a 4% increase from 2018. For example, in December 2021, 1.6 million WordPress sites were hit with 13.7 million attacks within only 36 hours.
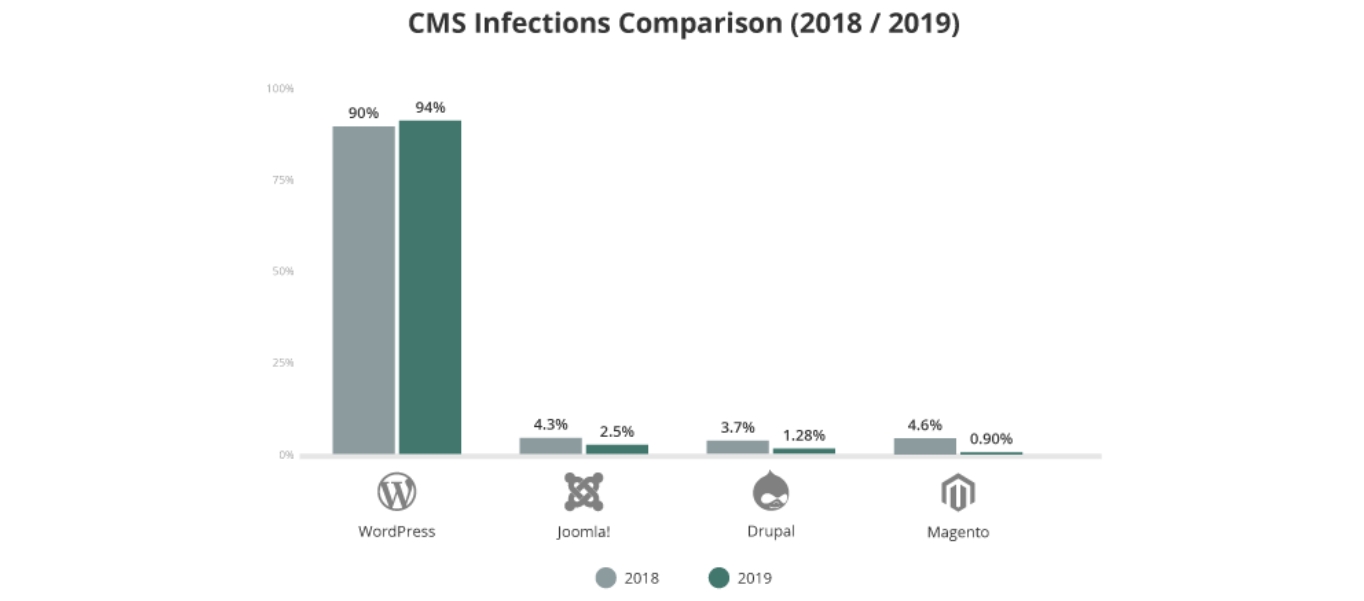
Is WordPress Secure Then?
The figure above might suggest that WordPress is not a good choice to begin with and is inherently insecure. However, that’s far from the truth.
The WordPress core product is very secure and, in fact, audited regularly by a security team of industry experts. Yet, nothing that’s connected to the Internet can ever be 100% safe and there are many factors that determine whether a site is likely to be compromised or not. The majority of successful hacking attempts actually come down to human error, which is something that we hope to alleviate with this post.
Plus, as already mentioned, just the mere size of the WordPress user base makes the CMS a focus for hackers because the likelihood is higher that they will find victims.
What Happens When You Get Hacked
Lost revenue and reputation, stolen information, the malware installed on your site that can infect visitors, ransomware that blocks your site until you pay the hacker — none of these sound appealing, right? Yet, that’s exactly what you risk if you don’t take WordPress security issues seriously.
Plus, Google might even blacklist you for these kinds of offenses. Imagine losing all your SEO efforts in one fell swoop. Scary right?
In short, if your site is in any way important for your business, then securing your WordPress website should be a high priority.
Follow Best Practices to Create Baseline Security
If you’re just learning how to make a website and follow the tips in the first part, your site will already be more secure than 99% of websites out there.
1. Protect Your Computer, Avoid Being a Risk Factor
You might be wondering, what does your computer have to do with your website? Easy: If your computer is infected with a virus or other malware and you access your site or upload files to it, those files can infect your website as well. To avoid that, make sure to:
- Refrain from using public wifi networks to access your site or use a VPN
- Install antivirus software and a firewall and keep them up to date
- Regularly run virus and malware checks on your operating system
- Update your operating system and other important software (such as your web browser)
For detailed instructions, check this post.
2. Build a Safe Foundation With a Trustworthy Host
Your hosting company is usually the first wall hackers have to break through to access your site. For that reason, the first step towards securing your WordPress website is to invest in a hosting company that implements proper security measures. This includes support for the latest version of PHP, MySQL, and Apache as well as a firewall and 24/7 security monitoring. In addition, look that they offer SFTP or SSH connections instead of the less secure FTP.
In addition, choose a hosting company that performs daily backups and regular malware scans (like SiteGround for example). You can even find hosting companies that employ various DDoS prevention measures. Also, be sure to check out what your hosting company offers in terms of help to recover compromised websites. When in doubt, always ask your host what security procedures they have in place.
3. Use Strong Passwords to Close Off Points of Entry
Passwords are one of the weak points of every website. Luckily, they are also something you have control over. In order to keep your WordPress website secure, be sure to use strong passwords for:
- Your user account
- FTP accounts
- The WordPress database
- Your hosting account
- Email address
- Everything else that is connected with your site
Also, change your passwords often. If you can’t come up with a strong password yourself, you can let a password generator create one for you.
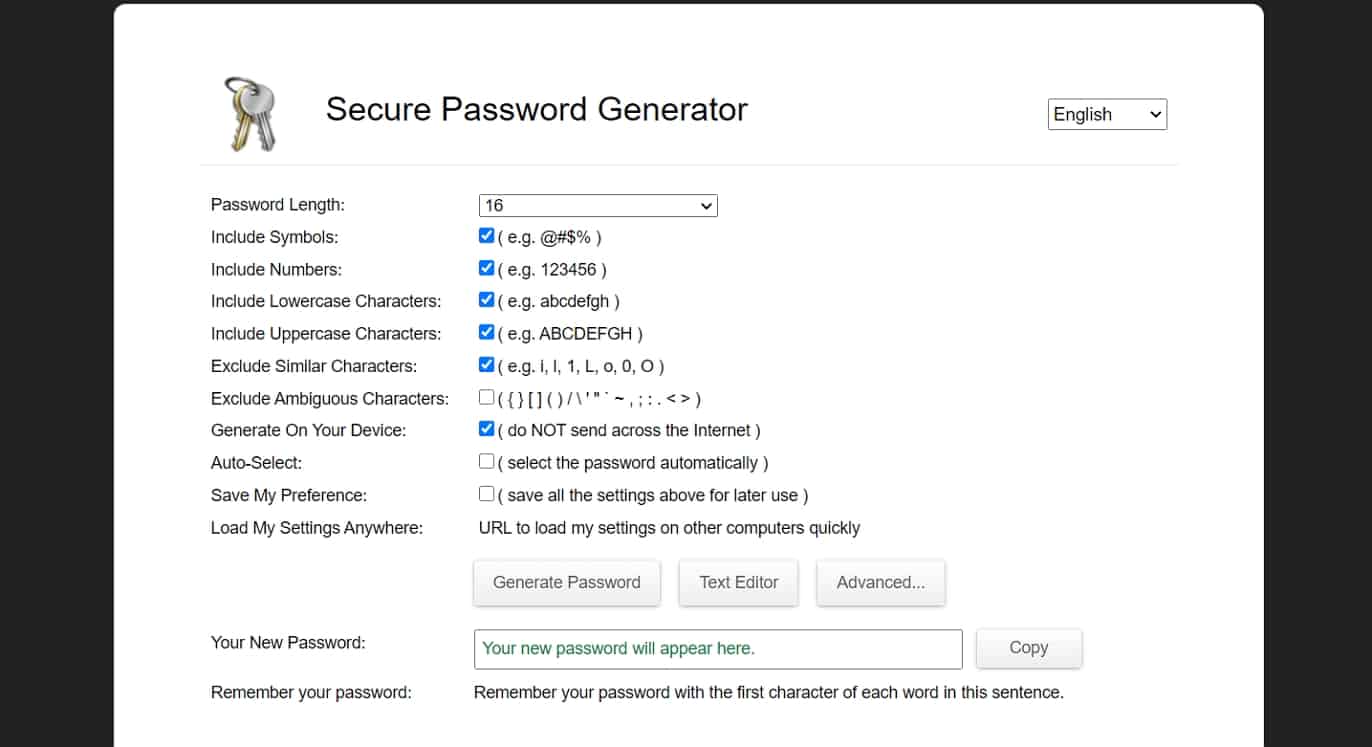
WordPress also proposes secure passwords to you and has an indicator that shows you your password’s strength.

Finally, if you have problems remembering your passwords, you can use a password manager like LastPass.
4. Apply Minimal User Permissions, Reduce Third-Party Risk
However, it’s not just about your own passwords, but also about those of other people on your site. To minimize the risk they pose, first make sure everyone only has permission to do what they need to do. For that, it makes sense to get familiar with WordPress user roles to understand what they do and what each role is capable of.
For example, you don’t want to give a one-time guest blogger admin access. A Contributor role is likely a lot more appropriate. In fact, you may want to set your default user role to Subscriber (under Settings > General > New User Default Role) to be on the safe side.

In addition, it is good practice for WordPress security to give out temporary permissions and revoke them later. You can easily do that by changing user roles in the Users menu and then switching back when the person has done their job.

Also, delete all user accounts you no longer need or that aren’t in use anymore. In addition, there are ways to force other users on your site to also use strong passwords. Many WordPress security plugins include this functionality and there are also paid products like Password Policy Manager.
5. Get Rid of the admin Username to Address a Common Loophole
WordPress used to set the default username as admin and many website owners never bothered to change it. As a result, admin is usually the first username hackers will try when they launch an attack against your site. If that name is present, all they need to guess is the password.
As such, you should never use that particular username for your WordPress website.
6. Obscure Your Administrator Account: Post as a Contributor or Editor
Consider creating a contributor or an editor account to add new posts and articles to your site.
How does this help? Well, WordPress automatically creates an author archive for every author profile who publishes something on the site. It’s usually located under something like yoursite.com/author/authorname.
The problem is that this gives potential hackers one part of the login information since the author’s login name is written out in plain text in the URL. Again, now all they all need to do is guess the password. For that reason, it’s better if the authors that are visible on your site are not the ones that have administrator rights.
7. Log Out Idle Users and Prevent Third-Party Screwups
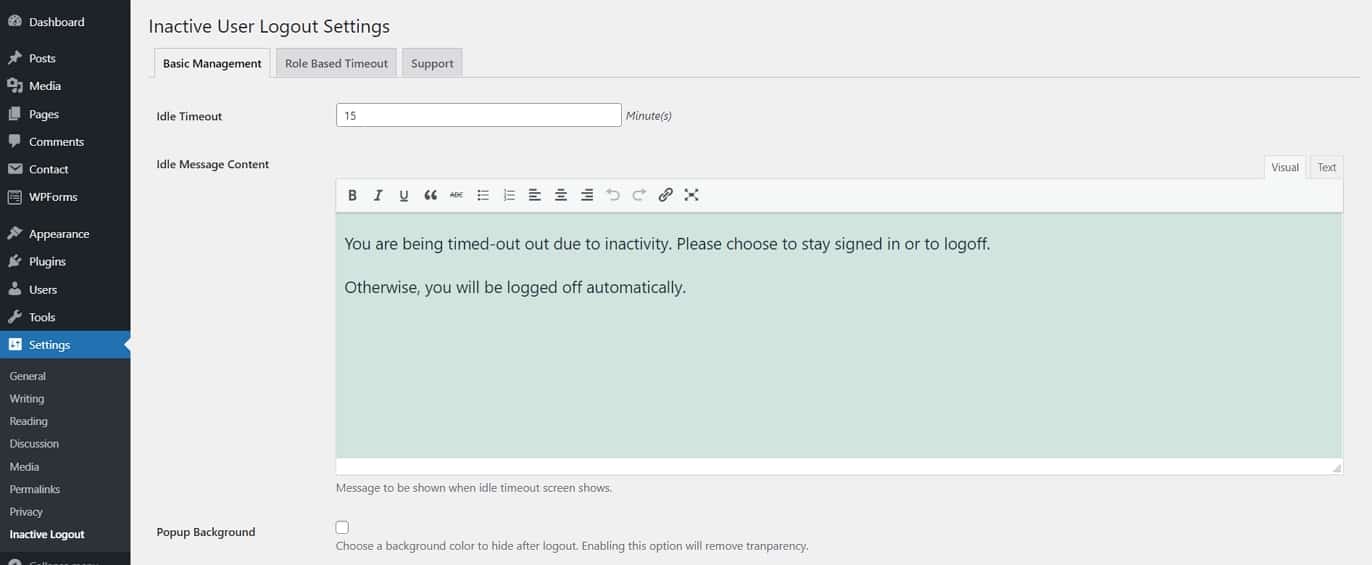
The next tip is to log out idle users after a period of inactivity. You probably know this feature from banking websites. It prevents you or someone else from compromising your site by accidentally staying logged in on a public computer or when they walk away from the screen for a while.
This is necessary because your session can be hijacked and hackers can abuse the situation for their gain. It’s even more important to terminate inactive sessions if you have multiple users on your website. Plus it’s easy, you can use a plugin like Inactive Logout to automatically do that.
8. Minimize Security Risks by Keeping WordPress and Its Components Up to Date
Outdated files pose a security risk because they leave your site vulnerable to exploits. This goes both for WordPress itself as well as components like themes and plugins. They receive updates for a good reason, often including security bugfixes. In fact, 98% of WordPress vulnerabilities are due to plugins.
You can manually update your website via Dashboard > Updates. Always remember to back up your site beforehand. Better yet, apply the updates on a staging or development site first, check if everything is alright, then apply them to the live site.
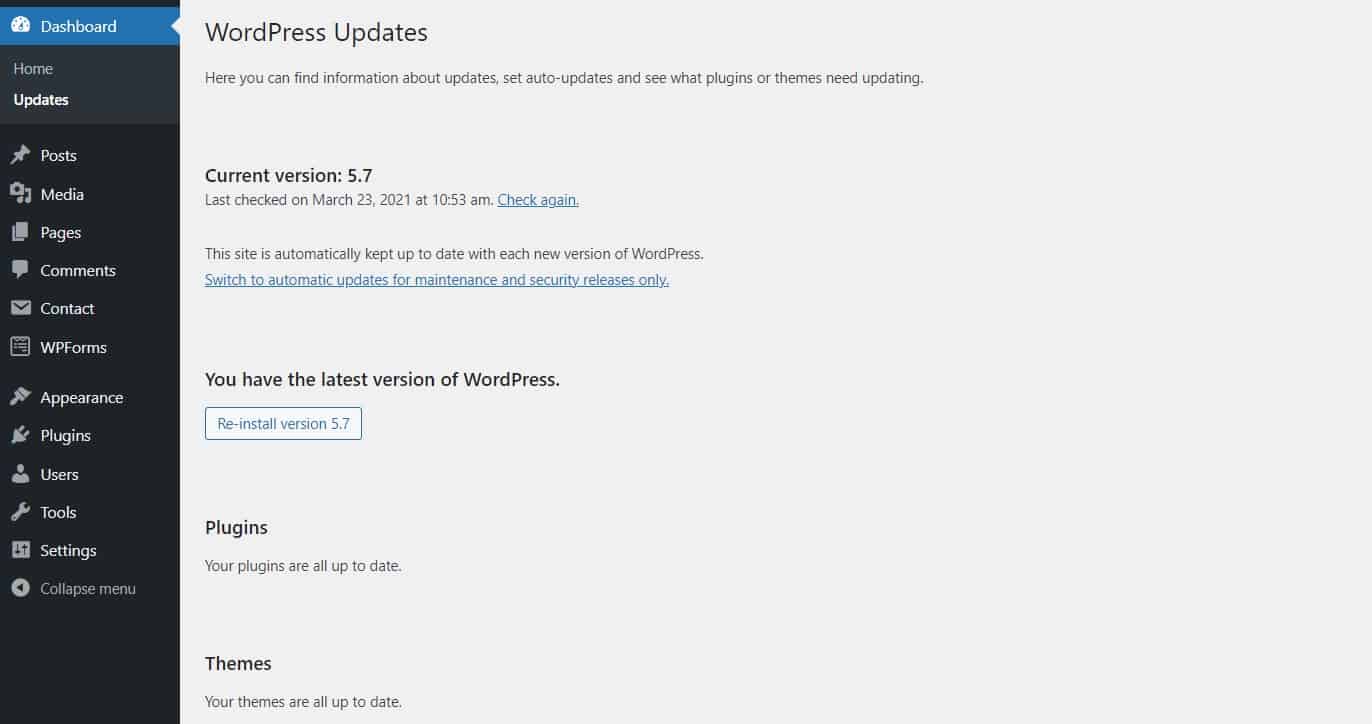
It’s also possible to use the WordPress auto-update function. Since version 5.7 is in the same menu, you can choose whether to automatically install only minor security and maintenance updates or major updates as well.

However, the latter comes only with a limited recommendation as it can break your site without you knowing about it.
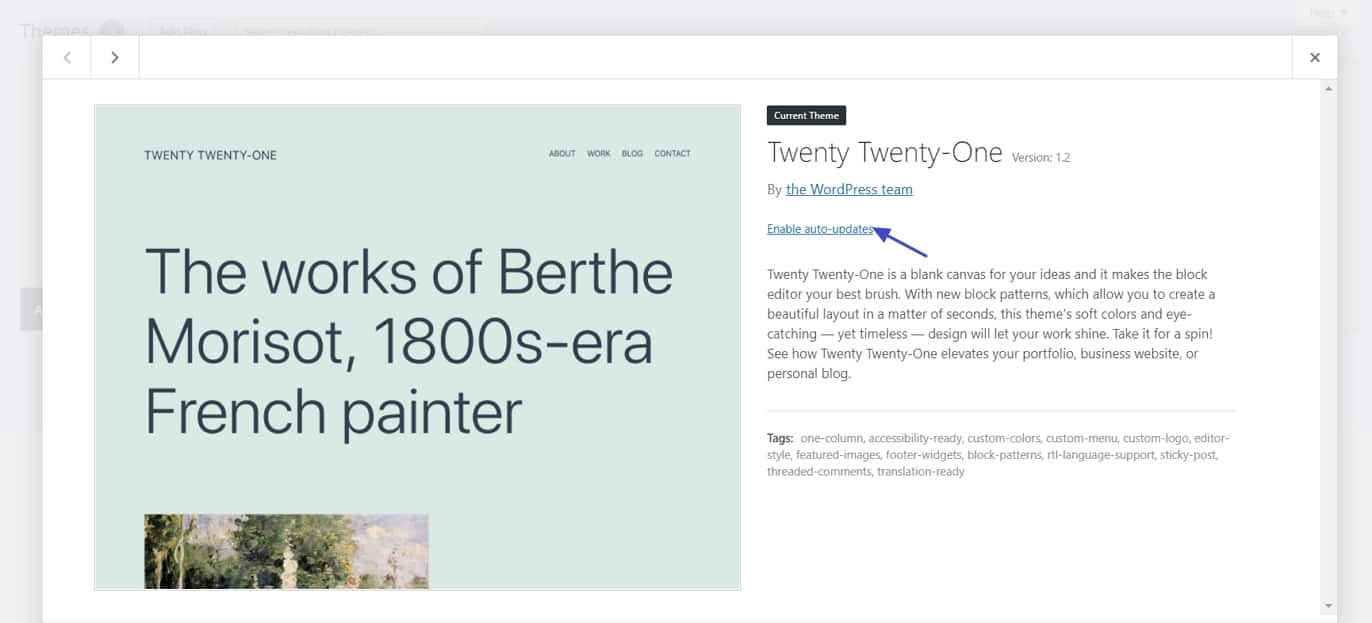
You can also enable automatic updates for themes and plugins. For themes go to Appearance > Themes, click on your template of choice, then use the Enable auto-updates link.
For plugins, you find this option in the Plugins menu on the right.
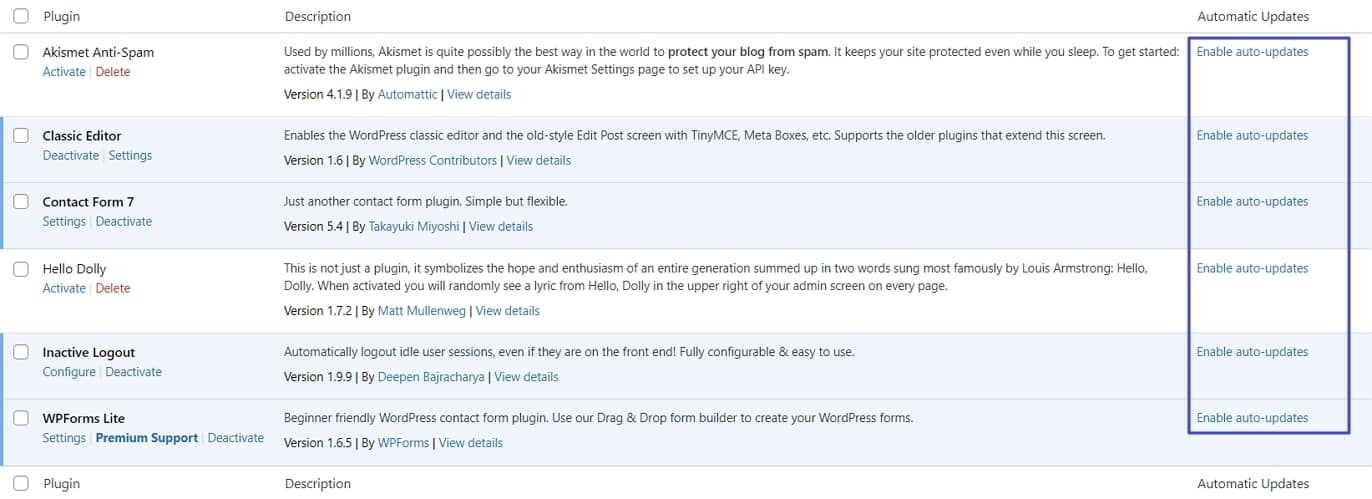
Alternatively, use Easy Updates Manager to manage these permissions. You can also configure much of it via wp-config.php. It’s also possible to update WordPress and its components manually.
Something you should also definitely do is to regularly go through your installed plugins and deactivate and delete what you’re not using anymore.
9. Only Use Themes and Plugins From Trustworthy Sources to Avoid Compromising Your Site
As we have already settled, unreliable themes and plugins are one of the main ways WordPress websites get compromised. In order to reduce the risk of that happening, step one is to use only extensions from reputable sources.
That means staying away from nulled, torrented, “free” versions of plugins and themes. Besides cheating developers out of the fruits of their labor, you never know what kind of code might be hidden inside. By uploading them to your site, it’s possible that you are opening backdoors for hackers all by yourself. So, stick with reliable sources such as the theme and plugin directory on WordPress.org or trustworthy premium vendors.
When you consider downloading a theme or plugin, to be on the safe side, check:
- Its number of users
- Reviews and rating
- Is it actively supported with regular updates?
- Compatibility with your WordPress version
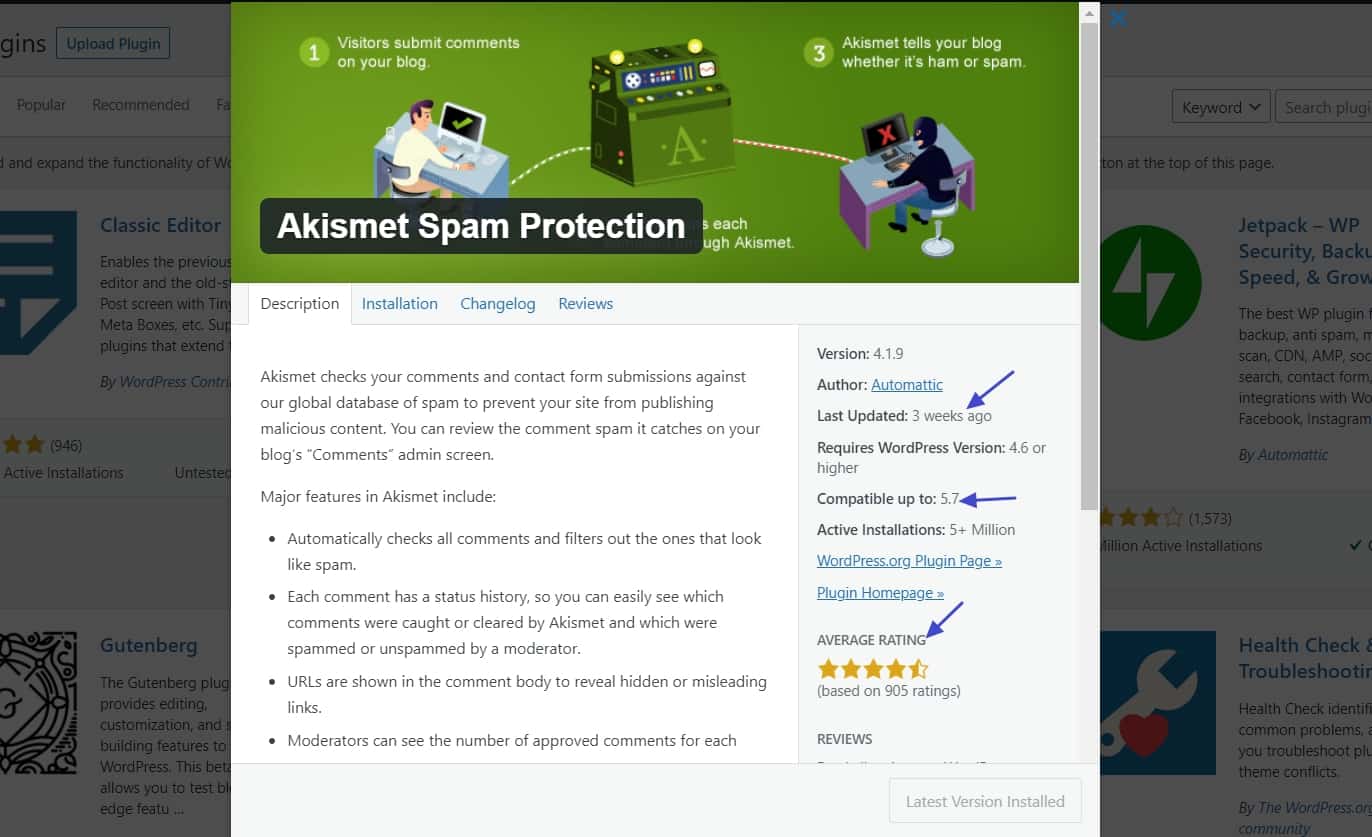
In short, use plugins and themes that are under active development and trusted by a large number of other users.
10. Use a Backup Service or Plugin for Much-Needed Insurance
If you’re not backing up your website yet, you need to start right away. A backup system will help you restore your site if the worst happens and your site ends up being hacked. Here are some plugins and services for that purpose:
Things to keep in mind:
- Back up both your site files and database — WordPress websites consist of two parts. Make sure to save both of them or you’ll regret it.
- Create a regular schedule — Set your backups to happen automatically at regular intervals. How often depends on your site and how frequently you change things or publish content. For a simple brochure website, once a week is enough. For an active blog, once a day or even more often can make more sense.
- Store the backup files offsite — Make sure your backup files go to Dropbox, Google Drive, or a similar service, not your own server. Otherwise, you risk having your backups infected as well or losing them together with your files if the server breaks.
11. Use Safe Server Connections, Keep Your Traffic Protected
Finally, as part of WordPress security basics, be sure to connect to your server safely. One of the most common ways to manage a server is to use FTP. We will also mention it a few times in this guide.
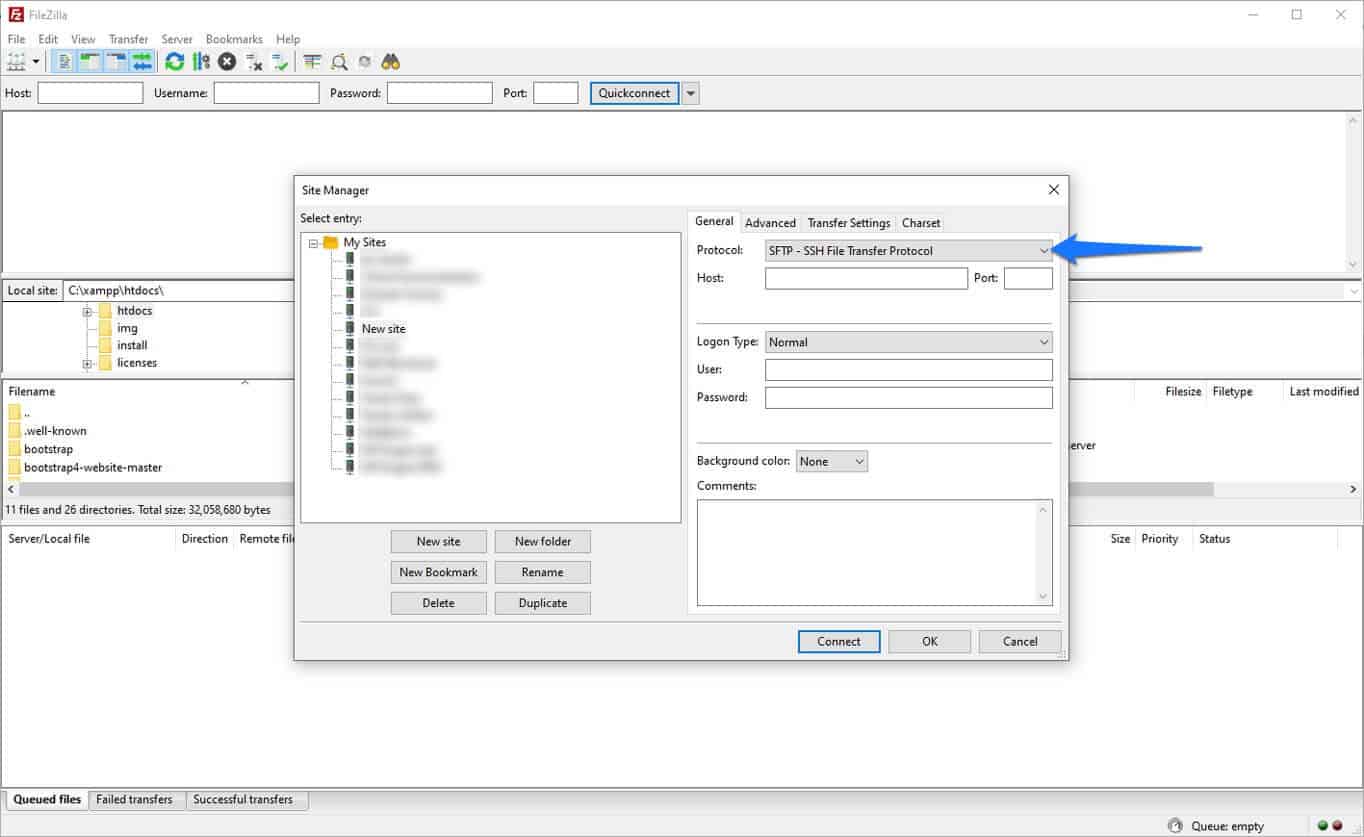
However, FTP has a much more secure cousin called SFTP, which automatically encrypts traffic between your computer and server. Whenever you can, use this instead of the unencrypted FTP protocol. Otherwise, you risk having your traffic intercepted and spied on. A good FTP client like FileZilla will allow you to do so.
Advanced Techniques to Secure WordPress
Alright, that was it for basic WordPress security best practices. From here on out, we will go over more advanced ways to keep your site safe. They might need few technical skills but are still pretty doable and will further fortify your WordPress website against disaster.
12. Harden The Admin Area and Prevent Brute Force Attacks
Of course, one of the most important and thus most safeguard-worthy parts of your website is the back end or dashboard. If someone gets access to it with administrator rights, there is nothing they can not do.
Hackers try to break in there with so-called brute force attacks. It means they automatically try out hundreds or thousands of login name and password combinations until something works. So, let’s go over some ways to keep that from happening.
a) Change the Default Admin and Login URL
By default, the URLs to log into your site are located at yourdomain.com/wp-admin or yourdomain.com/wp-login.php. Hackers know this and will attempt to access these addresses directly so they can brute force their way them.
Therefore, one of the easiest ways to prevent the majority of these attacks is to move the WordPress admin and login pages to other locations. This way, any attack on them runs into nothing. A plugin like WPS Hide Login makes this pretty simple.

b) Limit Login Attempts
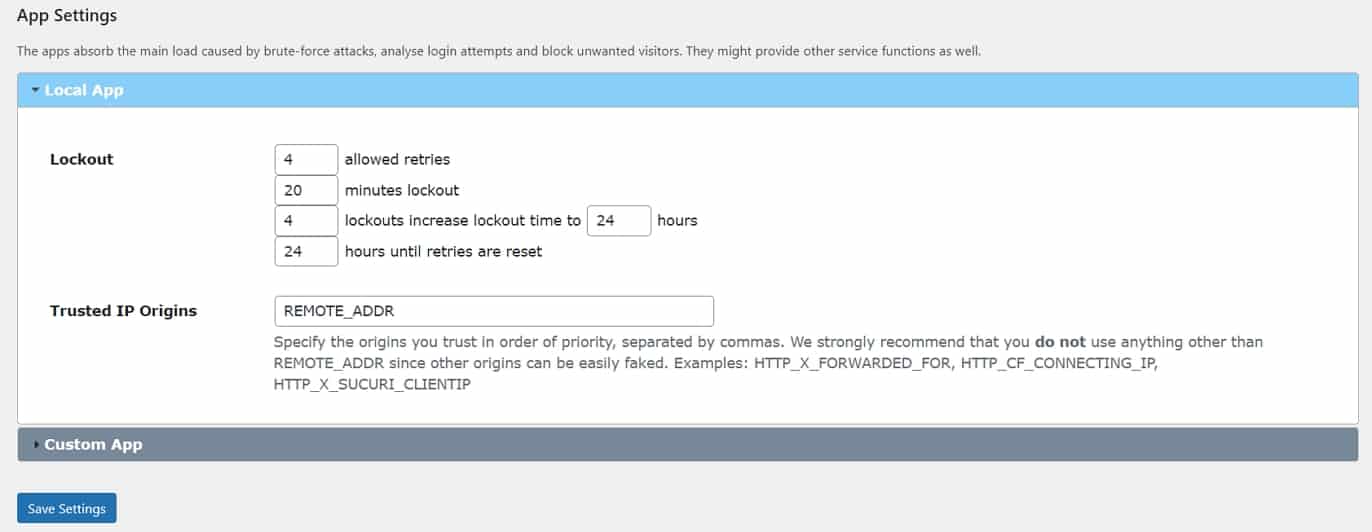
Another good way to stop these attacks in their tracks is to limit the times somebody can try to log in before they are blocked. WordPress has many plugins for that as well, such as Limit Login Attempts Reloaded.
c) Two-Factor Authentication
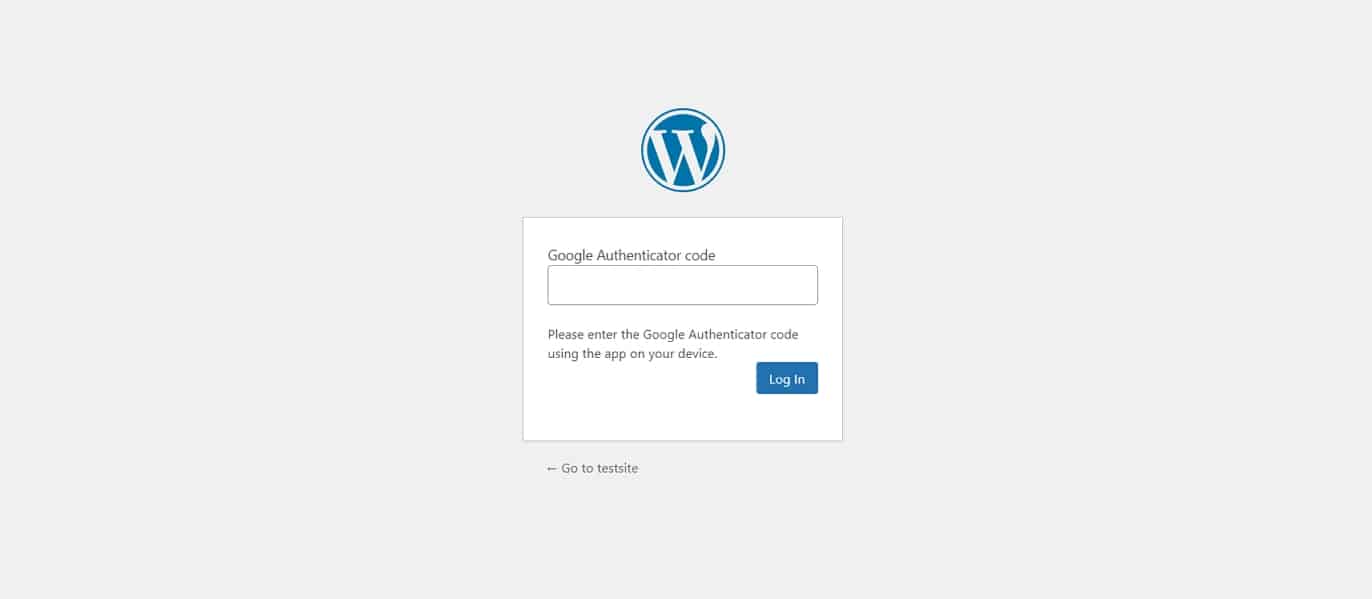
Two-factor authentication means that in addition to entering their password, users will also have to enter a code generated by a mobile app or some other device to log in to your site. So, even if hackers manage to guess or somehow acquire your password, they still can’t get into your site without, for example, your cell phone.
Consider using a plugin like Google Authenticator to set up two-factor authentication for your site:
d) Password Protect the wp-admin Directory
Another way to combat this kind of security risk is to protect the entire wp-admin directory with another password. That way, without it, hackers can’t even get to the WordPress login page.
Password protecting directories happens server-side. If you are running an apache server, create a text file named .htaccess (more on that soon) and input the following:
AuthName "Members Only"
AuthType Basic
AuthUserFile /path/to/.htpasswd
Require valid-user
<Files admin-ajax.php>
  Order allow,deny
  Allow from all
  Satisfy any
</Files>
This code creates a password-protected area called “Members Only” that’s only accessible to valid users with fitting passwords included in a file called .htpasswd and where it is located. The last part is an exception for admin-ajax.php that your need in order for it to work with WordPress. Upload this file to the wp-admin directory.
After that create another file called, you guessed it, .htpasswd and put this data into it:
username:password
These are all the usernames that have access to this directory (currently, just one) together with their passwords.
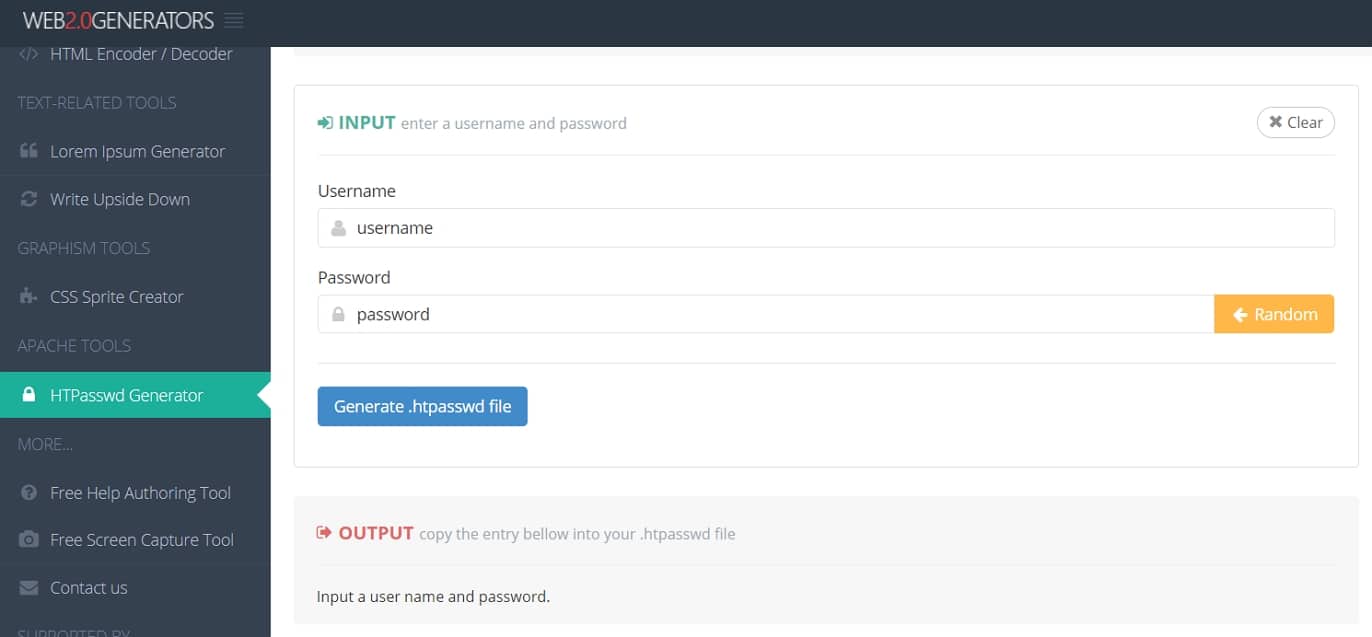
Important: the password needs to be encrypted for it to work. You can do this by entering your username and plain-text password and then copying the output.
Upload it to the location where your .htaccess points. You can do the same thing on an NGINX server. Alternatively, you can also lock down the URL with a Firewall and add an exception for only your IP address.
13. Keep Your Files Secure: Disable the WordPress Theme and Plugin Editor
By default, you have access to a file editor in the WordPress dashboard under Appearance > Theme Editor and Plugins > Plugin Editor.
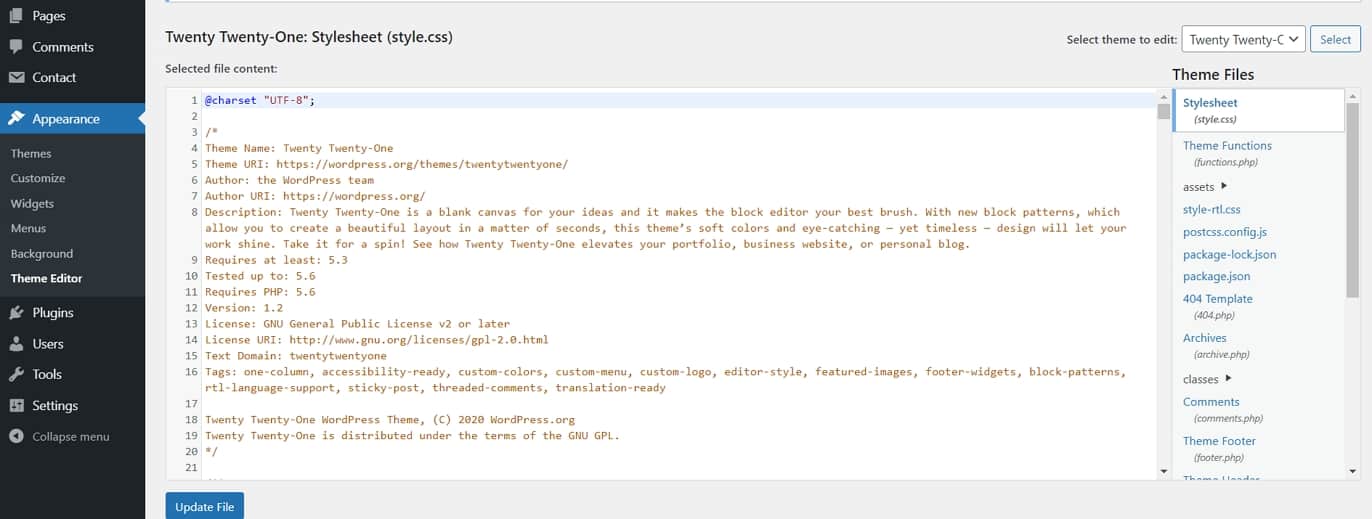
Here, you can make changes to WordPress files from directly inside the back end. This might come in handy when you need to quickly add a line of code. Yet, it also means that anyone who logs into your site with the right permission level can access those files with potentially disastrous results.
Disable this feature by adding the following code to your wp-config.php file just before where it says That's all, stop editing! Happy blogging.:
// Disable WordPress file editor
define( 'DISALLOW_FILE_EDIT', true );
What to do instead? Download your files via FTP, edit them locally, and re-upload them. Better yet, test all changes on a local development site, and only upload files once you have made sure everything is safe.
14. Check and Change File Permission Levels to Protect Data on Your Server
Files and folders in the WordPress directory on your server all have different permission levels. There are three types: read, write, and execute permissions. They determine whether users can access files, make changes, delete, and run them. Same with the content of directories.
If the wrong ones are in place, this can give people access to files they should not have access to and that they could use to take down your site. On the other hand, if permissions are too strict, they can disable some functionality.
You can check and change this with an FTP client. For example, FileZilla has a column called Permissions right in the user interface.
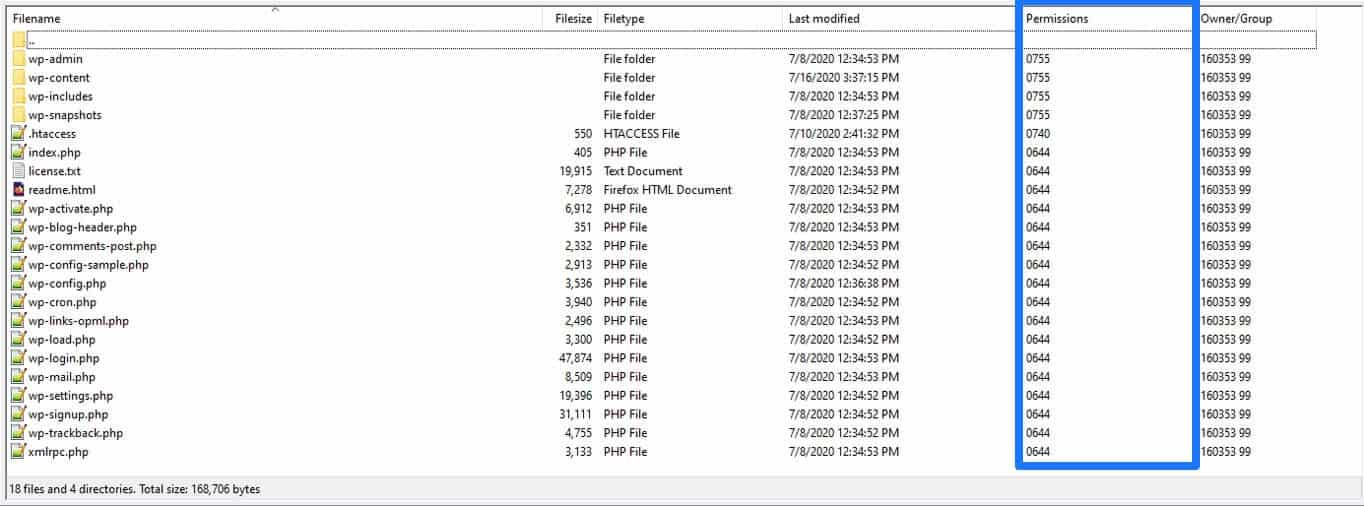
Changing them is as easy as right-clicking a file or directory and choosing File permissions… After that, simply input the right numeric value (see below) and click OK.
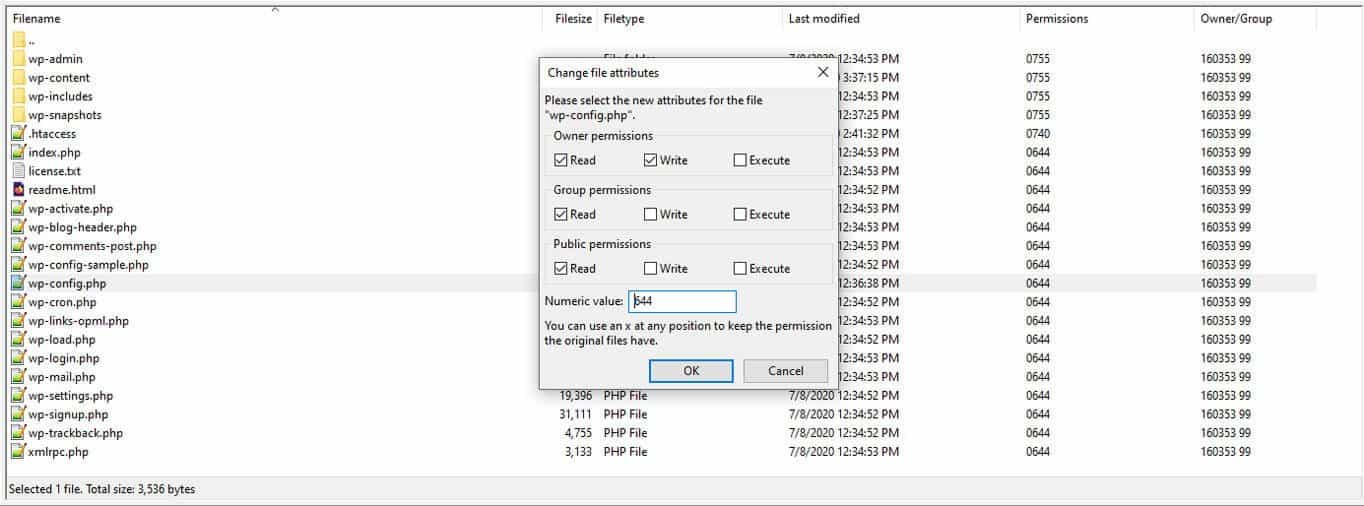
For instructions for cPanel, check here (toward the bottom). As for what permission level is right, according to the WordPress codex, they should be set as follows:
- All directories should be 755 or 750
- All files should be 644 or 640
-
wp-config.phpshould be 600
Some hosts might need different permissions so talk to your hosting provider if you run into problems.
15. Use HTTPS and SSL, Encrypt Site Traffic
HTTPS (Hypertext Transfer Protocol Secure) and SSL (Secure Socket Layers) allow visitor’s browsers to establish a secure connection with your hosting server (and therefore, your site). They ensure that all the information flowing between the two is encrypted.
Having SSL in place is mandatory for eCommerce and other sites that handle sensitive data like credit card information. However, even on a normal website and blogs, it makes it harder to steal login information. This is especially vital on a public network or when you have a lot of people who log into your site. In fact, the US government is moving all of its websites to HTTPS.
Encrypting your site traffic will not only increase your site’s security but will also benefit your search engine rank. For example, Google Chrome now shows all sites not on HTTPS as “not secure” in the browser bar.
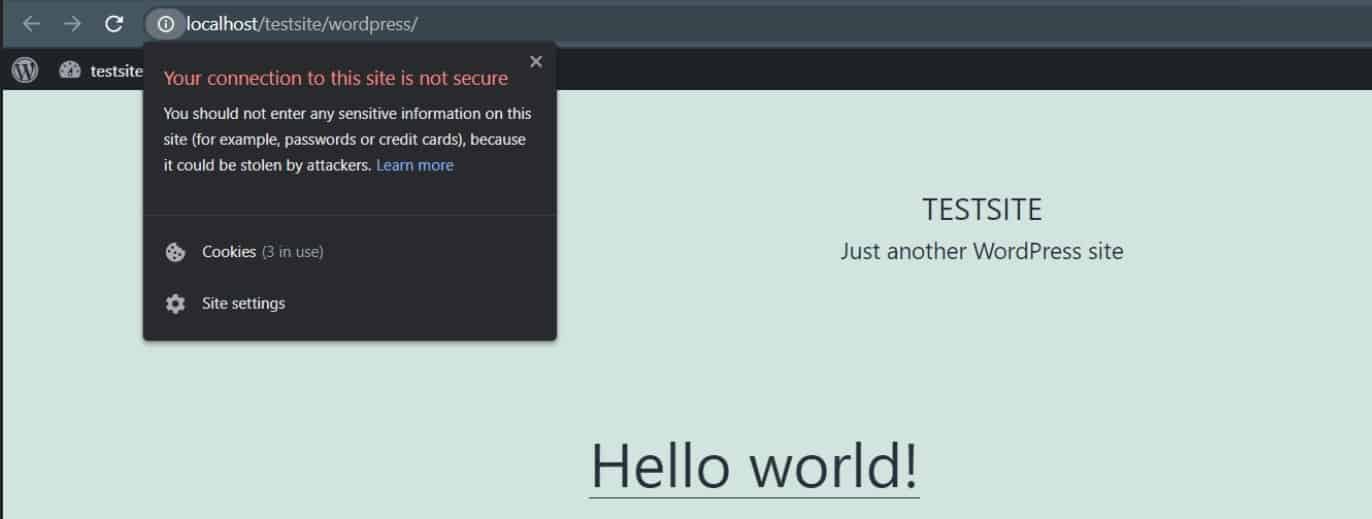
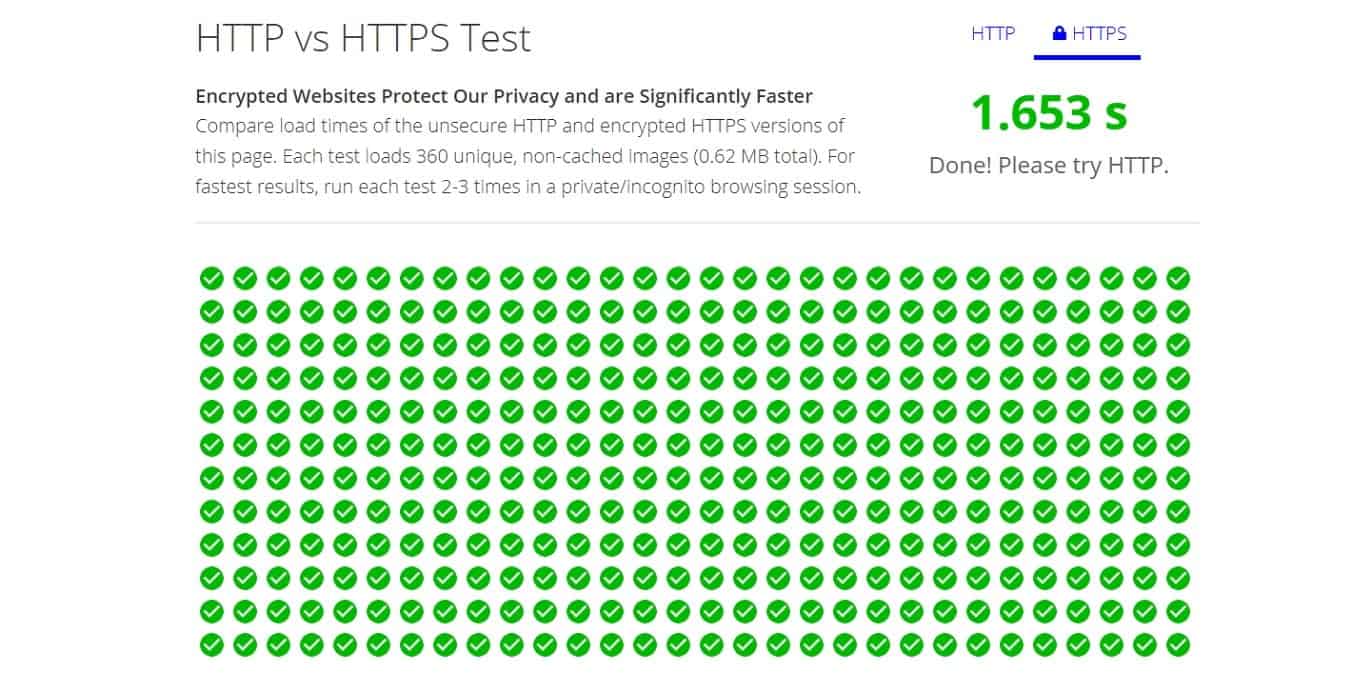
Finally, HTTPS is faster, because it uses the HTTP/2 protocol by default. So, it’s even something that can improve your site speed. You can test it yourself, here.
The problem with SSL was that it used to be expensive. You had to buy a certificate from a vendor and make it work with your site. However, now we have Let’s Encrypt, a project backed by Mozilla, Facebook, Google Chrome, Automattic, and others. It’s a free SSL certificate anyone is allowed to use.
Talk to your hosting provider and ask about the possibility of doing so. If they don’t offer Let’s Encrypt, they can at least help you obtain an SSL certificate or point you in the direction of a reputable company where you can buy one. If you want to find out more about how to move your WordPress website to HTTPS/SSL, you can use our detailed guide on that topic.
16. Disable XML-RPC and Close Down Another Point of Entry
XML-RPC allows your site to establish a connection with WordPress mobile apps and plugins like Jetpack. Unfortunately, it’s also a favorite of WordPress hackers because they can abuse this protocol to execute several commands at once. That means, instead of painstakingly trying out one password after another, they can test many at the same time and more easily gain access to your site.
Some plugins rely on XML-RPC to work properly. To find out if your site has it activated, enter your site address here. If it’s not active, you will receive an error message.

In that case, it might be a good idea to deactivate it to close this loophole. You can use a plugin like Disable XML-RPC-API to do so. Alternatively, it’s also possible to disable it by pasting the code below to your .htaccess file (more on that below).
# Block WordPress xmlrpc.php requests
<Files xmlrpc.php>
order deny,allow
deny from all
allow from XXX.XXX.XXX.XXX
</Files>
The line that says allow from XXX.XXX.XXX.XXX is optional. You can use it to allow continued access to XML-RPC for a particular IP address if necessary. Otherwise, delete it.
17. Use the Latest Version of PHP to Take Advantage of Security Updates
PHP is what WordPress runs on. It’s present on the server of every website built with the CMS. Just like WordPress, the programming language is constantly under development. New versions come with performance enhancements but also vulnerability fixes.
For that alone, it’s important that you run the latest version. In addition, each new PHP version also only receives support and updates for two years. The currently supported versions are 7.4, 8.0, and 8.1, so it’s highly recommended that you are on one of these. Unfortunately, only a little more than half of the WordPress sites are following that advice.
This is not really optimal though it has gotten better in recent years.
How can you change your PHP version if you want to take advantage of the latest versions? You usually have an option for that in your hosting administration menu.
However, be sure to test your site for compatibility first. So, first, try out the new version in a testing environment to see if all your plugins and theme functions work with the new version.
18. Harden wp-config.php, Protecting One of Your Most Vital Files
wp-config.php controls lots of important functionality on your site, not least the connection to your database. Without it, your whole site breaks down. Time to learn to protect it.
a) Move It to a Non-WWW Accessible Directory
Make the file harder to access by moving it from the root directory to a directory not accessible via browser. The easiest way is to simply move it up one level on your server. So if your root directory is at /var/www/html, you simply move the file to /var/www/. WordPress will automatically find it there so you don’t need to do anything.
If you want to put the file somewhere else, copy it to a new location. Then tell WordPress where it is by replacing the content of the original file with this (be sure to adjust to your actual file path):
<?php
include('/server/path/to/wp-config.php');
b) Change Your WordPress Security Keys
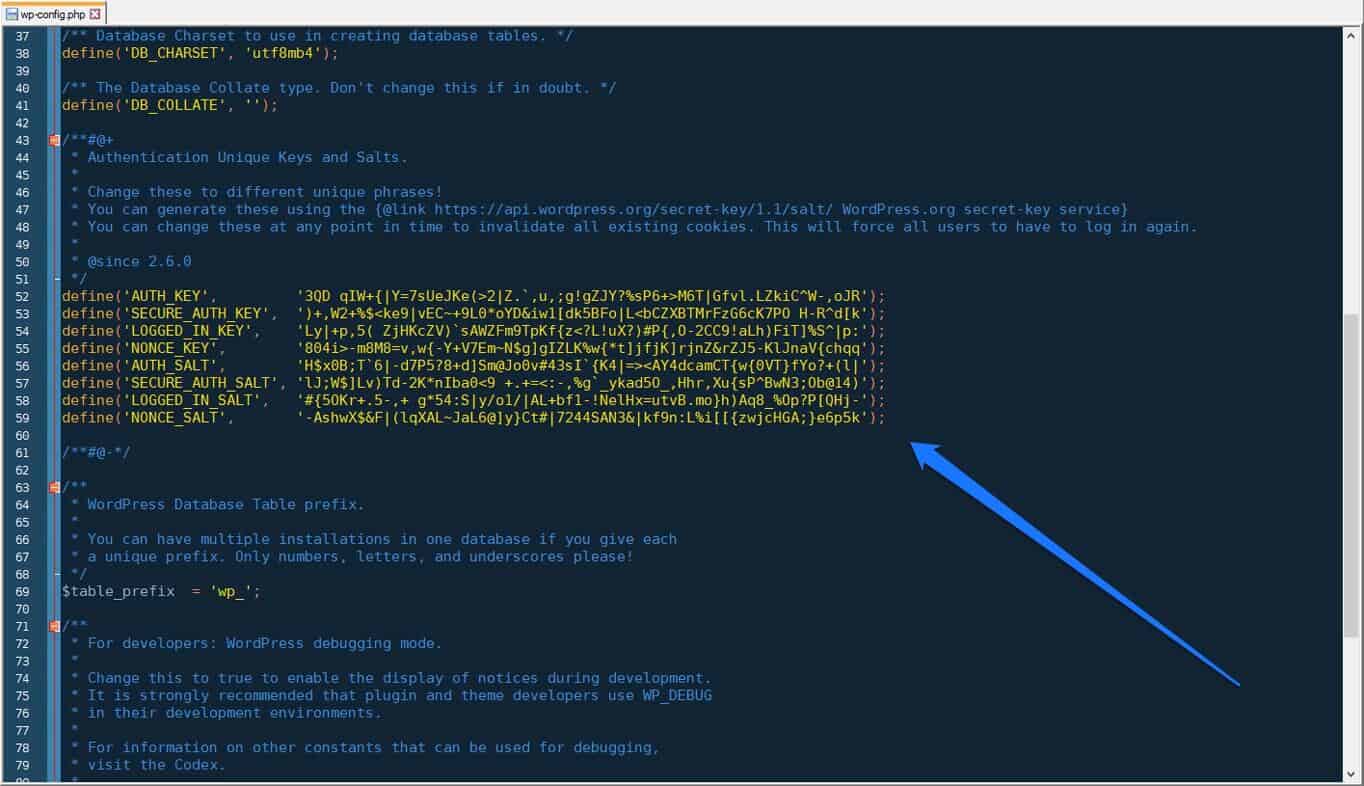
WordPress security keys are responsible for encrypting the information stored in your users’ cookies. They are located in the wp-config.php file and look like this:
define('AUTH_KEY', 'put your unique phrase here');
define('SECURE_AUTH_KEY', 'put your unique phrase here');
define('LOGGED_IN_KEY', 'put your unique phrase here');
define('NONCE_KEY', 'put your unique phrase here');
define('AUTH_SALT', 'put your unique phrase here');
define('SECURE_AUTH_SALT', 'put your unique phrase here');
define('LOGGED_IN_SALT', 'put your unique phrase here');
define('NONCE_SALT', 'put your unique phrase here');
These are randomly generated upon installation. If you have migrated your site or taken it over from someone else, it might be a good idea to renew them. For that, use the WordPress Salts Key Generator to get a new set of random keys.

Simply copy and paste over the keys in your wp-config.php
c) Check File Permissions
As mentioned earlier, to keep it safe, wp-config.php should have a permission level of 600. If you haven’t done so yet, now is a good time to check that that is the case. Use the instructions above to do so.
19. A WordPress File Integrity Check Alerts You When Your Site Has Been Compromised
Doing a file integrity check means monitoring if there are any changes to your site’s data. When you have malware on your site, you will often see new files or changes to files where the code is hidden.
Website File Changes Monitor is a WordPress security plugin that checks your files against the originals and will email you when it detects modifications or files that don’t belong. That way, you can catch hacks early on, find backdoors, malware, and infected files.

20. Find Weak Links Early With Activity Logging
The above is best combined with activity logging. WP Activity Log tracks what users are doing on your site, what changes they make, when they log in, settings they change, etc.
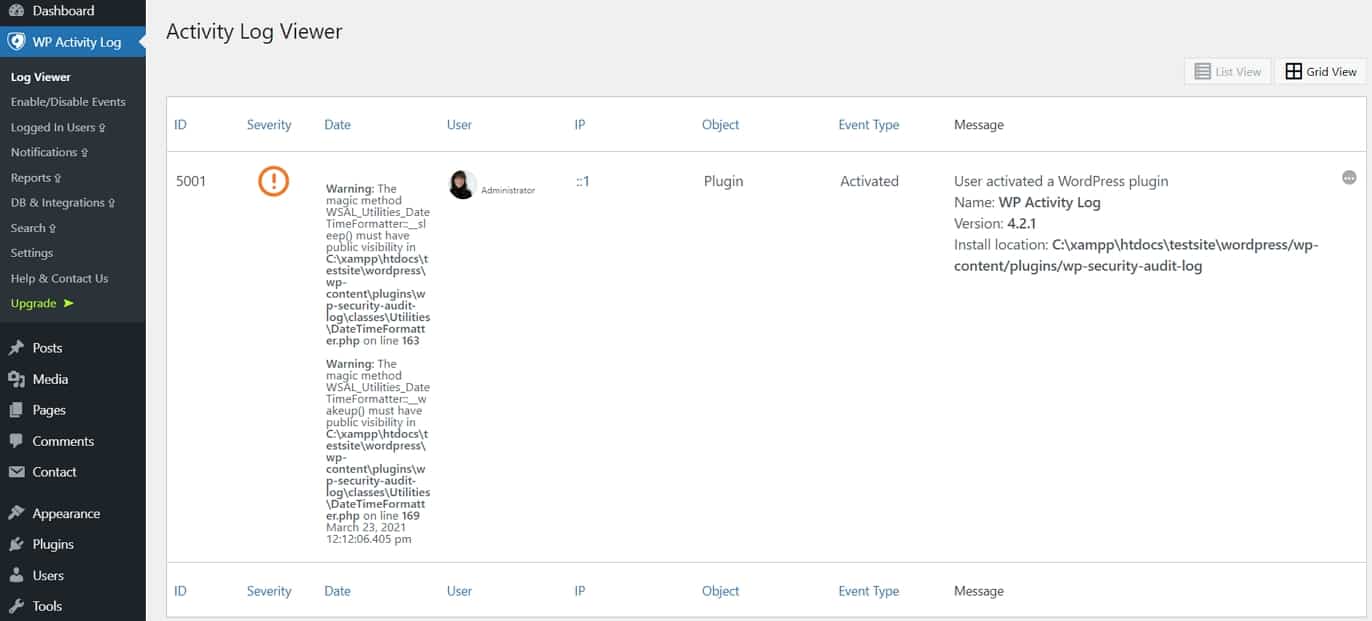
With this knowledge, you can find out who made a mistake when something goes wrong. You are also able to review if other users take any actions that might endanger your website. It also helps to see if someone comes to your site and wreaks havoc, like a user account that has been hacked or added secretly.
Technical WordPress Security Measures
Alright, for the final part of our guide on how to secure WordPress, we will look at some relatively complicated ways to protect your site. These will be quite technical so they can be intimidating. However, don’t let that scare you off, everything is still very doable.
21. Use .htaccess to Further Lock Down Your Site
.htaccess is a bit of a tricky file because it is hidden by default (as are all files that begin with a period). So, if you can’t find it on your server, it’s likely because you can’t see hidden files.
The solution is quite simple. In your FTP client, you usually have some function that makes them show up in the menu. For example, in FileZilla, you find it under Server > Force showing hidden files. In cPanel, you can use these instructions.

Once you can see it, you can download and edit .htaccess. Be aware that all code offered below should always be placed outside the # BEGIN WordPress and # END WordPress tags to ensure the changes aren’t overwritten with each new update.
a) Harden Your .htaccess and wp-config.php Files
.htaccess and wp-config.php are the most important files in your WordPress installation. As such, you need to make sure they are secure. The snippets below will limit external access to them.
# Deny access to wp-config and .htaccess
<files wp-config.php>
order allow,deny
deny from all
</files>
<Files .htaccess>
order allow,deny
deny from all
</Files>
b) Limit Access to wp-login.php to Your Own IP
In addition to the above, you can also add the code snippet below. This will disallow access to the login page of your site to everyone except for the defined IP. Be sure to fill in your own IP address to not log yourself out! If you don’t know your IP address, you can find it here.
# Limit access to wp-login
<Files wp-login.php>
order deny,allow
deny from all
# allow access from my IP address
allow from XXX.XXX.XXX.XXX
</Files>
You can also use this to limit access to wp-admin instead of password protecting it. Place an .htaccess file inside your wp-admin folder and include the following code in it.
# Limit access to wp-admin
<FilesMatch ".*">
order deny,allow
deny from all
# allow access from my IP address
allow from XXX.XXX.XXX.XXX
</FilesMatch>
If you are using a dynamic and not static IP, use these instructions.
c) Disable Directory Indexing and Browsing
Any directory that’s part of your website architecture is browsable by default if no index.html file is in it. This is no good because it lets people see what is in your directories and potentially use it against you. Protect yourself from that by adding this line of code to .htaccess:
# Disable directory indexing and browsing
Options All -Indexes
d) Disable PHP Execution in WordPress Directories to Keep Hackers Out
WordPress runs on PHP, therefore, you need for users to access and execute PHP files on your site. However, hackers can also use this ability to execute malicious files in those locations and maintain backdoors into your site. Therefore, it can make sense to block this ability in certain directories where you don’t need it like in the wp-content/uploads folder or inside wp-includes. You can create your own .htaccess file (simply create text file and name it that) and then add the snippet below:
# Disable PHP execution in this directory
<Files *.php>
deny from all
</Files>
Now, save the file and upload a copy of it to your uploads folder and wp-includes.
22. Disable Error Reporting and Keep Confidential Information Safe
Error reporting is useful for troubleshooting and determining which specific plugin or theme is causing something to malfunction on your WordPress website.
However, once the system reports an error, it will display your server path as well. Needless to say, this is a perfect opportunity for hackers to discover how and where they can take advantage of vulnerabilities in your site. You can disable this by adding the code below to your wp-config.php file:
// Disable error reporting
error_reporting(0);
@ini_set(‘display_errors’, 0);
23. Remove the WordPress Version Number to Stop Broadcasting Vulnerabilities
Anyone who takes a peek at the source code of your website will be able to tell which version of WordPress you’re using.
Since each WordPress version has public changelogs that detail the list of bugs and security patches, they can easily determine which security holes they can take advantage of. So, that’s not information you want to give out.
Luckily, there’s an easy fix. You can securely remove the WordPress version number from your site and RSS feed by editing your theme’s functions.php file and adding the following:
// Remove WordPress version number from head section
remove_action('wp_head', 'wp_generator');
// Remove WordPress version number from RSS feed
function remove_version_from_rss() {
	return '';
}
add_filter('the_generator', 'remove_version_from_rss');
24. HTTP Security Headers Fix Browser Weak Spots
Another way to secure your WordPress website is to implement security headers. These are directives that control the interaction of web browsers with your server/site. You can see what headers are active on your site via the browser development tools.
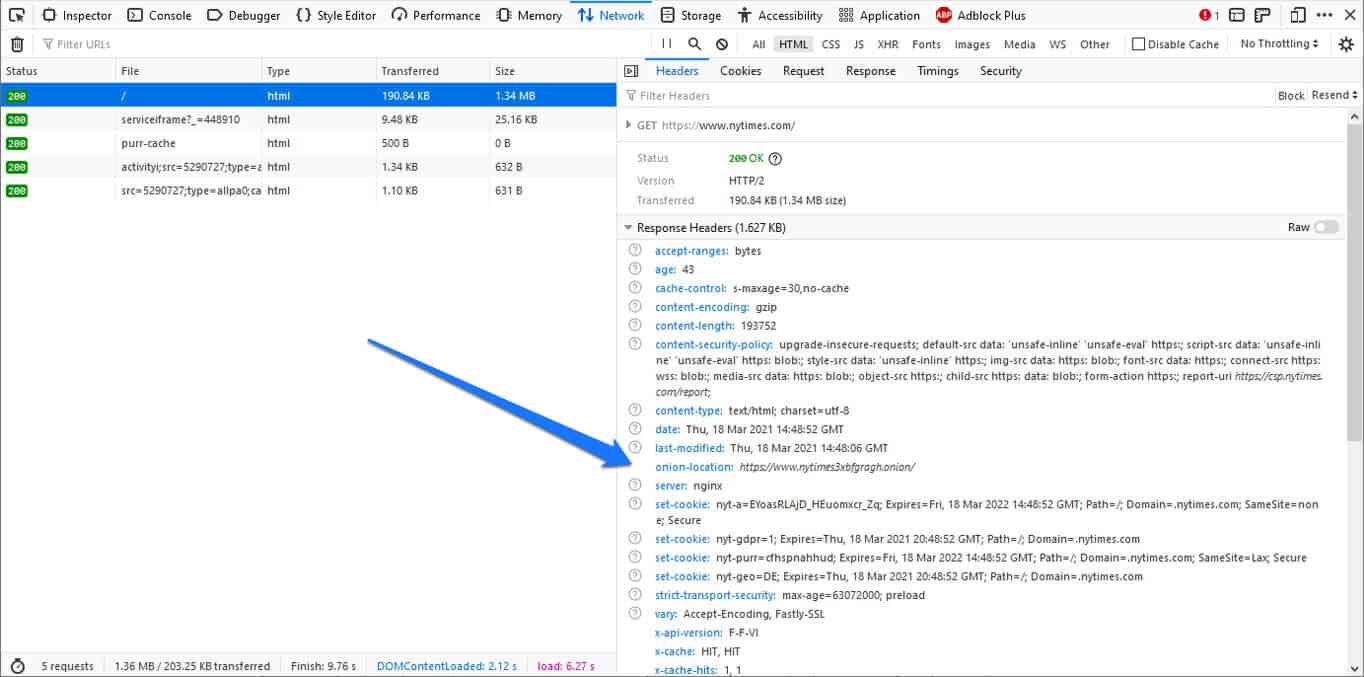
Alternatively, you can use this service to scan your site and find out.
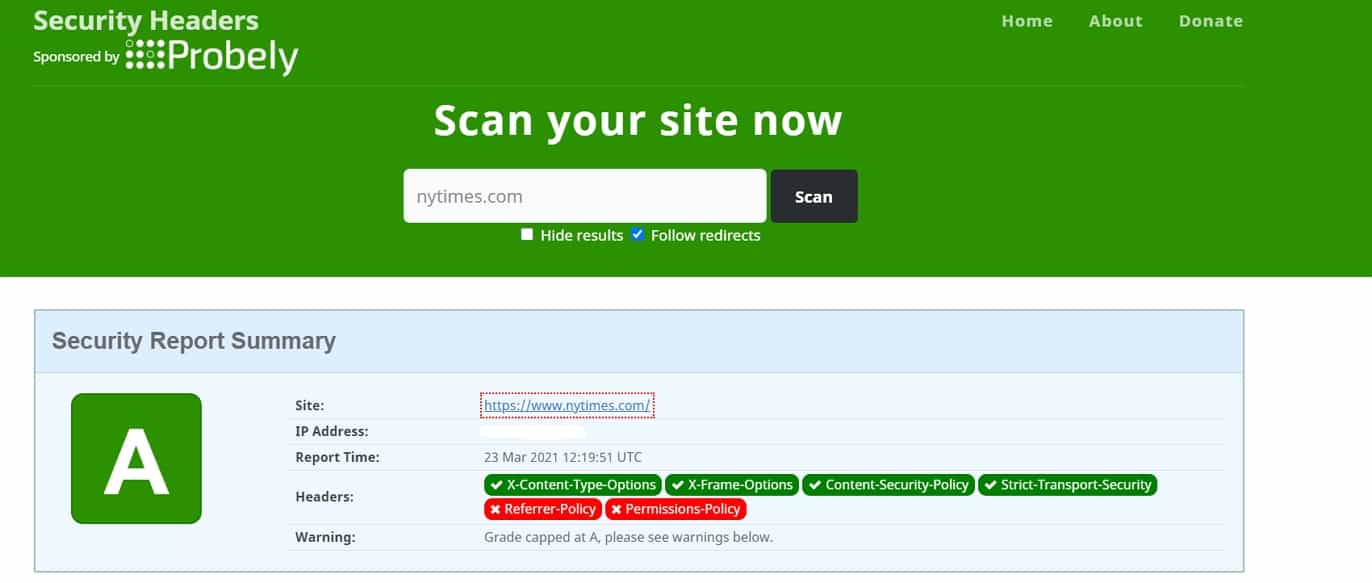
Typically they are set at the server level in order to prevent hacking attacks and reduce the number of security vulnerability exploits. You can add them yourself by modifying .htaccess to keep web browsers safe from potential attackers.
Before implementing anything below, be aware that it can affect your subdomains. So, if you have any on your site, you might have to include those as well. If you don’t want to add these headers manually, consider using a plugin like Security Headers. Be sure to test them using the tools above.
Prevent Cross-Site Scripting Attacks
These happen when hackers inject malicious code into your website so that it’s loaded by the client browser. To prevent the browser from loading malicious files, you can use the following piece of code:
header('Content-Security-Policy: default-src https:');Thwart Iframe Clickjacking
Add the line below to instruct the browser not to render a page in a frame. This helps prevent clickjacking.
header('X-Frame-Options: SAMEORIGIN');Enable X-XSS-Protection and X-Content-Type-Options
Add the following lines to prevent XSS attacks and tell Internet Explorer not to sniff mime types. The latter is to prevent hackers from accessing files on your server through browser functionality.
header('X-XSS-Protection: 1; mode=block');
header('X-Content-Type-Options: nosniff');
Enforce HTTPS
Add the code below to instruct the browser to only use HTTPS. We have already talked about how using encryption helps keep data safe. Of course, in order to use this, your site actually has to run on HTTPS.
header('Strict-Transport-Security:max-age=31536000; includeSubdomains; preload');Set Up Cookie with HTTPOnly and Secure Flag
Tell the browser to trust only the cookie set by the server and that the cookie is available over SSL channels by adding the following:
@ini_set('session.cookie_httponly', true);
@ini_set('session.cookie_secure', true);
@ini_set('session.use_only_cookies', true);
25. Use a Firewall and Stop Attacks Before They Even Begin
For the last two parts of this WordPress security guide, we want to talk about more premium options. One of them is using a web application firewall (WAF). It’s another layer of protection that you can set up before traffic even reaches your site.
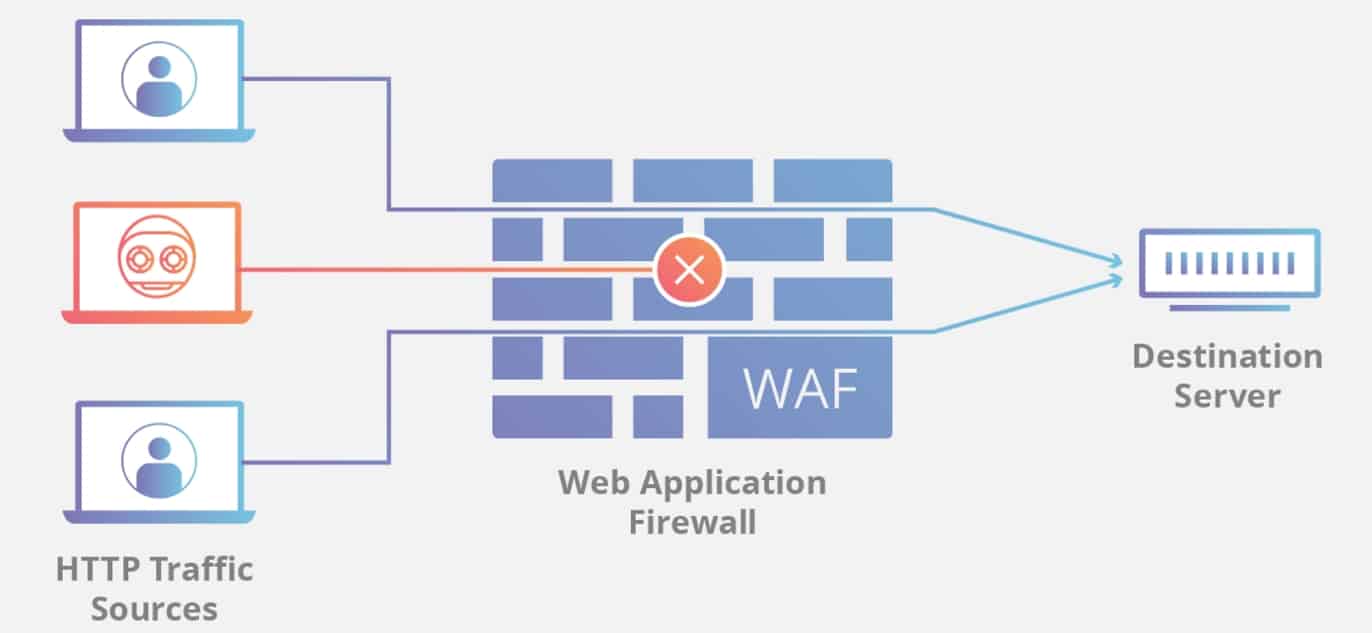
Installing a firewall on your site offers many benefits. You can set up rules as to who can access your site and who can’t. It also monitors and manages network traffic. You are able to block IPs and users, even whole countries that are blacklisted or have tried to harm your site in the past.
A firewall is also able to stop DDoS attacks in its tracks if it detects malicious traffic. That way, it doesn’t even hit your web server and can’t slow it down.
There are free firewalls in some security plugins (see below). However, if you really want to make the most of it, go with a paid provider. Like hosting, you get what you pay for. Sucuri and Cloudflare are the gold standards in this area.
26. Ease the Burden By Installing a WordPress Security Plugin
The final tip on how to secure your WordPress site is to use a security plugin. There are a bunch of all-in-one solutions out there that can do many of the things covered in this guide automatically. They will also alert you to weaknesses in your security setup.
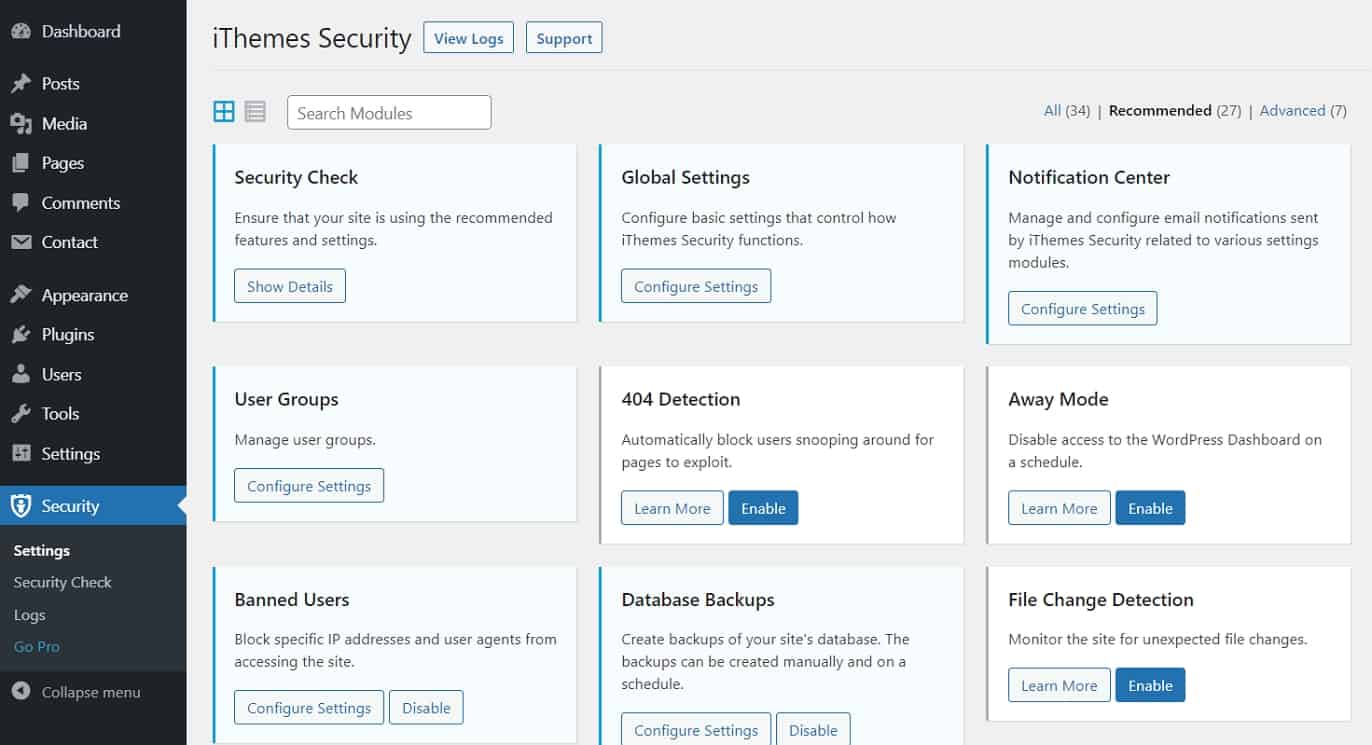
Here are a few to choose from:
Just be aware that the features are different. So, do your research beforehand in order to pick the one most appropriate for your needs and skill level.
WordPress Website Security: Last Words
WordPress is a powerful and popular CMS that makes it easy for anyone to create a website. But because it’s so widely used, it’s also a favorite target for hackers.
Luckily, there are a number of steps you can take to protect your WordPress site. Be aware though that you don’t have to do every single thing mentioned above. Follow the basic best practices and you are already well ahead of the curve.
After that, implement what you can and feel capable of. Security is an iterative process, not a one-and-done deal. You can always do more but the most important thing is to get started.
What’s your favorite WordPress security measure? Let us know in the comments!
